
Rogue Blight First Clear Guide
Map routes, build pairing, boss timing, and the decision chain from the forest to Blight Castle.
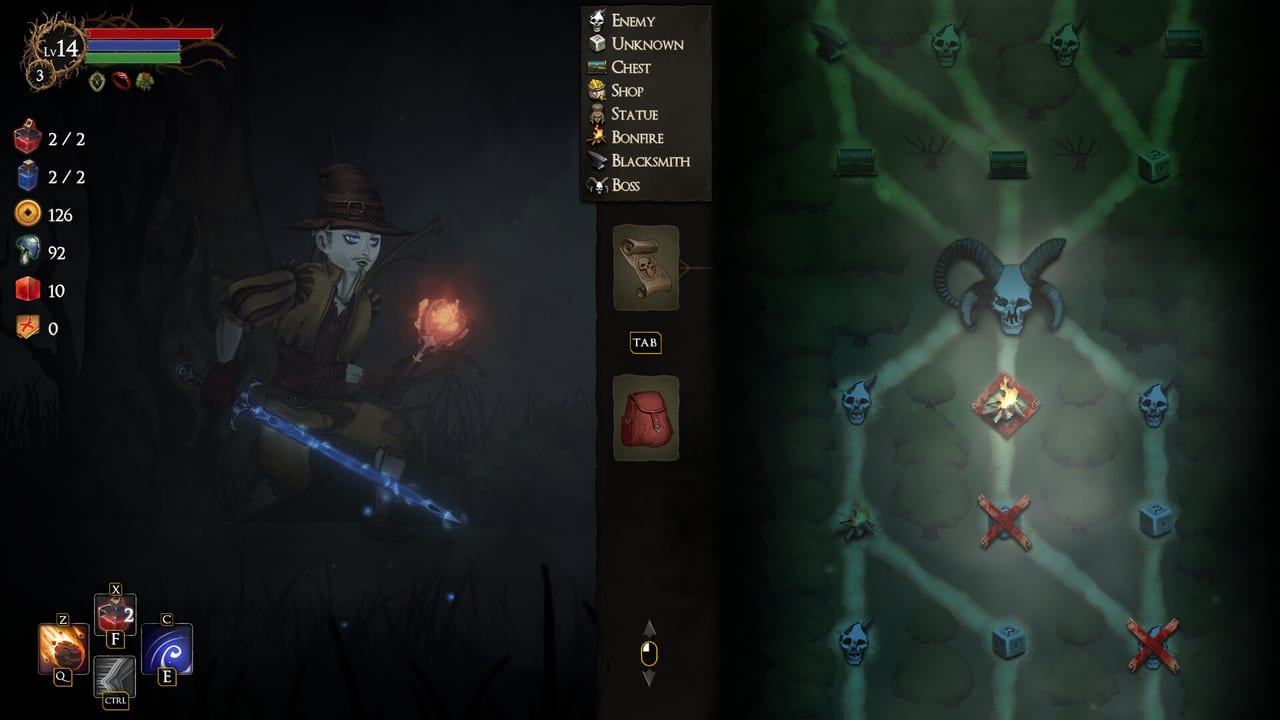
A first clear in Rogue Blight is decided on the branch map before you reach Lady of Blight. Rooms shuffle each run, so there is no tile-by-tile script. What stays consistent is the decision chain: repair the resource about to fail, make both hands serve one combat plan, test that plan against the Waywood bosses, and stop changing it once Fireworn City begins. This page is that chain. It is not a move list, and it does not invent damage numbers.
If you have not finished the tutorial or your first sanctuary visit, start with getting started. Boss method details are on bosses. Node legend is on map encounters. The walkthrough covers chapter paths in more detail. This page is the focused first-clear decision manual.
Choose the branch by the problem it fixes
Read every visible fork before picking the next node. Your destination is not the branch with the most fights or the fewest steps. It is the branch that repairs the weakest part of the run before the next boss gate. Check four things in order: current health and potion stock, whether the two equipped hands form a usable pair, whether spare gear can fund an upgrade, and which resource bar the pair consumes fastest.
| Run state | Best node | Why | When to skip it |
|---|---|---|---|
| Wounded or low on potions | Bonfire | Restores before the next duel or boss | Only when already healthy and another branch offers a needed upgrade |
| Two or more unused drops | Blacksmith | Turns spare gear into power on the pair you keep | When there is nothing worth smelting yet |
| One hand has no useful job | Shop | Can supply the missing weapon family or blessing | When gold is low or both hands already serve the same plan |
| The pair works but lacks a multiplier | Chest | Adds a blessing without forcing a family change | When survival is already failing and a heal is nearby |
| One bar limits every fight | Statue | Lets health, mana, or stamina match how the build actually spends | When another branch fixes a more immediate failure |
| Healthy and stocked but underpowered | Enemy | Provides currency, experience, and gear | When an extra duel risks the resources reserved for the gate |
| The run can absorb a bad result | Unknown event | May create value that predictable nodes cannot | When one poor outcome would end the attempt |
Work backward from the gate when two branches look equal. Prefer the line that puts a bonfire or a meaningful upgrade immediately before the boss. Take extra enemies earlier, while a mistake can still be repaired. Put uncertain events before the final recovery node, not after it. That positioning turns a lucky unknown into profit and keeps an unlucky one from being the last thing before a boss fight.
Make both hands answer the same fight
Rogue Blight lets you combine one-handed swords, daggers, and wands, while a shield is restricted to the left hand. Each equipped item gives the build another action. Before entering a node, describe the two actions without naming the weapons. “Block the committed strike, then punish from mid-range” is a plan. “Two high-rarity drops” is not.
For a first clear, use one of four practical shapes:
- Sword plus shield: the conservative answer while boss timing is unfamiliar. Aim the defense toward the incoming arc, then use the sword only after the string ends. A shield will not rescue a grab, so the dodge still stays funded.
- Two daggers: the close-range option for a player who already trusts the dodge. Frequent connections build a chosen status quickly, but short reach makes every unnecessary third attack dangerous.
- Two wands: the spacing option if the route has supported mana. The safer lane disappears when both the mana flask and bar are empty, so route toward mana rather than pretending range is free.
- Mixed melee pair: a flexible response to imperfect drops. Let the faster hand apply pressure or close distance and reserve the longer-reaching hand for the confirmed opening.
Matching weapon families can enter a synchronized dual-wield attack. Both weapons swing together, but attack damage and status apply rate drop by 40%. Do not read one tooltip, double it, and assume the result. Compare the complete attack in the current client, including how often it connects, what it does to the status meter, and whether its recovery still leaves a dodge.
Blessings are best judged by the event they change. A death-prevention blessing buys one mistake; it does not make reckless attacks correct. A benefit that activates while health is high turns prompt healing into offense. Extra forge resources matter only if a smith remains on the route. Ignore a letter grade when the condition is absent from your run.
At the blacksmith, keep the two weapons and armor pieces that reinforce their stats or survival requirement. Smelt the attractive spare that would force a late identity change. Upgrade the active pair, then swing it in an ordinary encounter before trusting it to a gate.
Keep one dodge after every punish
The stable combat loop is observation, commitment, short punish, recovery. Begin at the edge of the enemy’s reach and let one full sequence play without trying to win the damage race. Count the committed strikes, note whether the enemy turns after your dodge, and watch the recovery after the final motion. On the next sequence, spend only enough stamina to reach that recovery and land a short response.
Two hits that leave an escape are worth more than a third hit that empties the bar. The failure signal is simple: if the boss begins its next tell while stamina is still near zero, the punish was too long. Shorten it before buying more damage.
Weapon skills usually draw on mana, but that does not make them a substitute for stamina management. A forward skill can deliver you into melee range with no exit if the light attacks already emptied the other bar. A buff should begin before the planned opening, not as a panic response inside an enemy wind-up. Preserve the dodge first, then decide whether the opening can afford a skill and follow-up.
Health and mana potions require a real recovery window. Swap to the needed flask using the controls shown in your current build, then drink after avoiding the sequence. The community control pages disagree on some controller labels, and patch 1.00.06 notes that native PlayStation controller support was still planned. For that reason, this guide does not hard-code a universal controller button. The inventory and control screen in your build is the authority.
Use Waywood to prove the build
Treat Waywood Forest as a proving ground. The launch walkthrough and community-reviewed recordings follow Gorilla and then Wendigo through the forest. The forest should answer three questions before you leave it: can the pair punish without consuming the escape, can it maintain its chosen status or damage condition, and can the route arrive at a boss with recovery resources intact?
Gorilla: move across the attack line
Use Gorilla’s wake-up to take a readable middle distance. Its size tempts players to retreat in the same horizontal lane, but forward pressure and shockwave make straight retreat the dangerous answer. Dodge across or through the line when the tell is understood, turn your aim to the new side, and take a compact punish. If the body blocks your view, leave sooner rather than adding a blind attack.
Later in the fight, faster and wider pressure reduces the value of greed. Save a potion or mana-dependent defensive action for that portion instead of proving the build during the calm opening. A failed attempt in which Gorilla repeatedly catches the end of your combo is not a gear mystery; remove the last attack. If the run cannot meaningfully hurt it during safe openings, the blacksmith or pairing decision is the missing piece.
Wendigo: let the floor cancel your offense
Wendigo adds delayed danger to the arena. When a ground marker appears under the player, movement takes priority even if a long skill has already been prepared. Hold a middle distance: close enough that a punish connects, far enough that a lunge or delayed blast does not overlap the entire recovery. A grab is a committed threat, so do not treat a shield as the only answer.
Some captured builds use an Earth Bash to create Shatter, followed by Fragment Cannon while the condition is active. That is a useful example of a setup and payoff, not required loot. If those tools appear, begin the setup only when the floor is safe and abandon the cannon when a marker forms underfoot. If they do not appear, reproduce the logic with your own pair: one hand creates the opening or effect, the other cashes it in.
Leave Waywood with a proven sequence, not a backpack of alternatives. If both bosses were won by the same defensive response and the same two actions, preserve that identity into Fireworn City. Change only the piece that failed a specific test.
Change the finish in Fireworn City
Fireworn City changes what “the enemy is dead” means. In the community-reviewed first-clear route, defeated enemies can still create an explosion. End the final hit at range or immediately move out of the body instead of opening the inventory or relaxing beside it. If this costs too much health across ordinary nodes, route to the smith or bonfire before adding another fight.
The reviewed first-clear route meets Statue Dweller and then Shadow in that order. Against Statue Dweller, the decision is whether the arm or detonation tell has finished. Back away during the large burst and arm sweep; return only after the committed motion. Trying to chase the body through the sweep turns a valid damage window into a trade the player rarely wins.
Shadow asks for lateral movement. Dodge the lunge to the side, leave any glowing ground area, and punish the recovery instead of following its movement with a long animation. If a ranged skill is part of the build, lead only enough to meet the target after the lunge. If sustain comes from a weapon effect, use it inside the same safe gaps as damage rather than extending the exchange just because health can be recovered.
Do not rebuild around a late Fireworn drop unless it fixes a named failure immediately. By this point, upgrading a familiar weapon and keeping compatible armor is usually safer than splitting stats around a rare-looking item.
Enter Blight Castle with the build already decided
Blight Castle should be routed conservatively because every optional risk now sits in front of a three-zone investment. Favor the final heal and useful smith over an extra enemy chain. Take a shop only when it completes the established pair or solves an empty flask problem. An unknown event is reasonable while the run can still survive an adverse result; it is not automatically worth gambling immediately before the gate.
Jester: rehearse the final timing
Jester is the last useful audit before Lady of Blight. Do not rush its tricks and lunges. Let the visible sequence resolve, deliver the same setup-and-payoff you used in Fireworn, then leave. If the status or skill window repeatedly expires before the payoff connects, shorten the setup or move closer before starting it. If healing is required during every exchange, return to the route problem rather than expecting the final boss to be kinder.
Lady of Blight: wait for the third action
Lady of Blight rewards patience more than novelty. Community-reviewed footage shows a three-part melee sequence as the clearest recurring opening. Stay outside the beginning, avoid the complete string, then move in after the third action commits. Spend the prepared damage window and exit with stamina available. Starting the punish after the first swing is the common way to be caught by the rest of the sequence.
Her teleporting slam and grab are heal checks in reverse: once either attempt has missed and its recovery is visible, there is room to drink or apply the setup. Healing while the teleport is unresolved gives the boss a stationary target. Blocking a normal arc does not make the grab safe. A player using a shield still dodges the grab and uses the left-hand defense only on attacks it can actually face.
If the health bar stops moving, diagnose the specific break:
- If the setup lands but the payoff misses, correct range and aim before changing gear.
- If both actions connect but stamina prevents the exit, remove a follow-up or choose a stamina-supporting statue when the next run offers one.
- If the pair cannot survive one mistake, route through health, recovery, or a defensive blessing instead of stacking another conditional damage bonus.
- If the build functions until the final section and then collapses, reserve mana and a potion for that pressure rather than spending them to shorten the opening.
The victory is the result screen after Lady of Blight, followed by the return to progression. The reviewed footage proceeds from repeated Lady victories to a Blight Core and then the Blight Lord, but one playthrough cannot establish a universal unlock count. Use the Sanctuary and current-client prompts to determine the next requirement in your own save.
Know what the first victory opens
The official launch announcement describes repeatable New Game+ progression with increasing difficulty and Challenge Maps as short, harder runs that award currency. A particular Challenge Map instance allows only one attempt; after a failure, another must be found during Story Mode. Enter after the first-clear combat loop is reliable, and preserve a defensive resource because there is no immediate retry for that instance.
Do not interpret “near-endless” progression as proof of a fixed boss order, permanent tier list, or exact cycle at which every later encounter appears. The reviewed recording visibly proceeds from repeated Lady victories to a Blight Core and then the Blight Lord, but one playthrough cannot establish a universal unlock count. Use the Sanctuary and current-client prompts to determine the next requirement in your own save.
This guide deliberately does not publish a permanent weapon or blessing tier list, fixed drop route, proc percentage, exact post-clear cycle count, or unsupported move names. Where the generated map, random drops, or later progression prevents a fixed answer, the guide gives a decision check instead of inventing one.
Sources: identity, release data, core systems, and original media come from the official Rogue Blight Steam page. Post-clear boundaries come from the official launch announcement, and the version boundary comes from the official Patch 1.00.06 note. Route and fight decisions were cross-checked against community guides and the reviewed walkthrough recording.
Frequently Asked Questions
Quick answers to the most common questions.
Should I use a shield or dual daggers for a first clear?
Shield is more forgiving while you learn boss timing. Dual daggers are faster and apply status better but require confident dodge timing. If you are unsure, start with sword plus shield and swap after the first clear.
When should I heal during a boss fight?
After a combo, during the boss recovery — not during a windup. Roll once to make space if you must. In Fireworn City, also move away from enemy bodies that may explode after death.
Can I change my build in Fireworn City?
You can, but you should not unless a specific piece failed a named test. By Fireworn, upgrading a familiar weapon and keeping compatible armor is safer than splitting stats around a new drop.
What is the most common first-clear mistake?
Taking too many fights before the boss gate and arriving with empty potions and no blessing. Work backward from the gate and prefer bonfire and chest nodes in the final stretch.
Does Lady of Blight have phases?
Community footage shows a three-part melee sequence as the clearest recurring opening. There are also a teleporting slam and a grab. Heal after those misses, not during the windups.
What do I do after the first clear?
The Sanctuary opens further progression. New Game+ raises enemy damage, speed, health, size, and status apply rate. Challenge Maps are one-attempt side runs with good currency rewards. See New Game+ and Challenge Maps.